

Algeth'ar Academy Mythic Dungeon Guide
Dragonflight Buff at The Start
The first thing about this dungeon you need to know is that you can choose to align with a Dragonflight at the start of the dungeon giving you a 5% stat buff depending on which you pick.| Dragonflight | Buff | Effect |
| Bronze Dragonflight Recruiter | Bronze Dragonflight Pledge Pin | 5% Haste |
| Blue Dragonflight Recruiter | Blue Dragonflight Pledge Pin | 8 Mastery points(584 rating) |
| Green Dragonflight Recruiter | Green Dragonflight Pledge Pin | 10% Healing taken |
| Red Dragonflight Recruiter | Red Dragonflight Pledge Pin | 5% Versatility |
| Black Dragonflight Recruiter | Black Dragonflight Pledge Pin | 5% Critical Strike |
Which Route to Go?
After you choose your buff, you can choose to go left or right, as the first part of the dungeon is somewhat circular.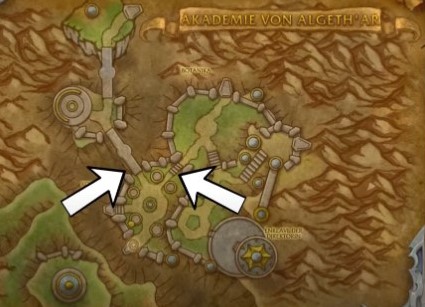
You will return at the start with the gate open to the final boss once you've killed the first three bosses.

Overgrown Ancient
Overgrown Ancient Notable Trash
Overgrown Ancient Boss Fight
The boss will spawn adds with swirlies using Germinate under your feet, so you want to try and stack them close together to the boss without getting hit by the swirlies and then cleave them down.

The boss also summons one ancient Branch mob using Branch Out that puts a permanent bleed on your entire party and occasionally casts a heel that needs to be kicked.

Once you kill it, it will spawn a circle on the ground that your party has to stand in to remove the bleed. Don't get tricked and run away from the circle. If you don't clear your bleed and then another one spawns, you'll get a second stack of it, taking double damage.

Lastly, when the boss reaches 100 energy, it will cast Burst Forth, which does heavy party damage, and you should pressure defensives during this.

Crawth
Crawth Notable Trash
The next platform going this way is the boss Crawth which first summons a bunch of waves of bird adds and then eventually becomes active.
The big eagles have an enrage ability: Call of the Flock that needs to be kicked and a frontal, but otherwise, they're pretty straightforward.
Crawth Boss Fight
Each Screech does more and more damage until you shoot three balls into the goal, resetting the boss to zero stacks. Each goal gives you a buff but also makes the fight harder in some way.

The right side goal stuns the boss making him take increased damage, but then the fire starts to rain on the platform for the rest of the fight;
The left goal spawns orbs that increase your haste but also put deadly, slightly moving tornadoes in the boss room.
The best strategy was to wait as long as possible before scoring the goals so that the fight was less lethal and we had damage cooldowns to use with the Buffs.
Vexamus
Vexamus Notable Trash
The flying Arcane Forager worm guys charge at players, and then the big one does a frontal cone after that charge.
Spellbound Scepter casts Mystic Blast, dealing heavy damage to your entire party so that should be interrupted.
Spellbound Battleaxes put a stacking bleed on your tank that hurts pretty bad too.
The boss room contains Elementals that deal magic damage similar to some of the boss's mechanics. Surge is an upfront hit, and Mana Void is a DOT that explodes at the end.
The last mob in the area is the textbooks with a long sleep channel that must be stopped or dispelled.

Vexamus Boss Fight
The boss will put out three Mana Bombs on three players dealing damage, so when you see these, it's a good idea to use a defensive.
Finally, the boss will knock everyone back and create a series of swirlies under their feet. This can be pretty tough to see and caused most of the deaths we've seen on that boss while we were learning.

Echo of Doragosa - Final Boss
Echo of Doragosa Notable Trash
Other Caster mobs put out Astral Bomb. These bombs are debuffs that blow up after a short period, but they also damage the enemies, so dragging the bombs on top of the packs makes them die even quicker. Once you make work of those, you could move on to the final boss.
Echo of Doragosa Boss Fight
Whenever you are hit by an ability, you'll gain a stack of Overwhelming Power. Alongside taking damage, this gives you a five percent increase per stack. However, once you reach four stacks, you lose them all, creating a portal on the ground.

Each portal shoots out orbs in every direction, and these orbs also deal damage and cause stacks. This means the fight can go downhill quickly if people get hit by lots of stuff. However, the boss attacks are generally slow and predictable enough that few of these portals should be lying around. A good strategy was to get everyone to two stacks or so early just for that big damage boost, but after that, played pretty conservatively so that you don't fill up the room with too many portals. Just DPS the boss down, and then you win.
Final Thoughts
That covers my quick rundown of Algeth'ar Academy for Dragonflight in Mythic+ mode. I hope it was helpful. You can also check out the short video guide below.

