

Guide Navigation

More from Wowcarry

April 23, 2024
3 minutes
This blog post provides an analysis of DPS balance on Amirdrassil during the week of April 16th, using data from Warcraft Logs Raid Statistics. It examines the rankings and statistics for different specs and classes, but also mentions the potential biases and limitations in the data. The post aims to give a perspective on the current state of class balance for Dragonflight Season 3.

April 23, 2024
3 minutes
Blizzard announces free character transfers from PvP to PvE realms in Season of Discovery for US and EU players. The transfers will be available periodically throughout the week, allowing players to switch to a ruleset that better suits their preferences. Don't miss out on this limited-time event if you want to migrate your character!

April 23, 2024
4 minutes
This blog post explores the new Earthen Dungeon armor and weapon models in the War Within expansion. It discusses the different sets available, as well as potential updates to the armor colors and future robe options for the cloth set.
Raszageth - Vault Of Incarnates Normal / Heroic / Mythic Raid Strategy Guide
January 01, 2023
9 minutes
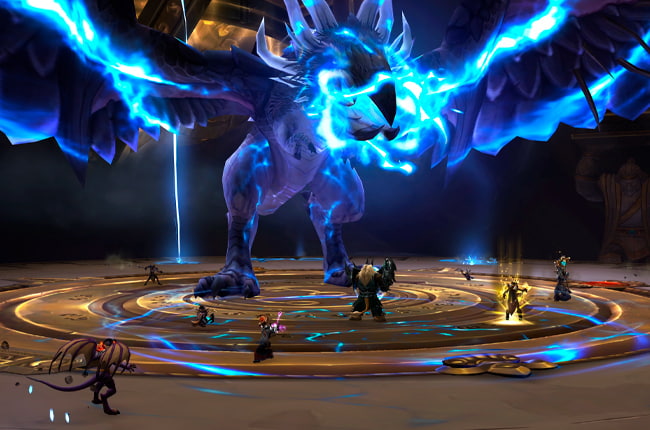
Welcome to the Vault of the Incarnates Raszageth raid guide for normal, heroic, and mythic difficulty. This fight has three main phases and two intermission phases, so it's a long one. We're gonna go through phase by phase to make it super simple.
Raszageth's Electric Scales also deal raid-wide AOE damage and additional random damage, so keep everyone topped off. The big combo you need to watch out for is Static Charge and Hurricane Wing. Static Charge is a debuff on a few random players that deals damage over time, but you drop a big AOE on the floor when it expires. You need this AOE for the following ability: Hurricane Wing.
Hurricane Wing knocks everyone back far enough that you'll go off the platform quickly unless you stand in the AOE left behind by Static Charge. So the plan here is to drop all of your Static Charges on the edge of the room and make a safe zone behind your raid. When Hurricane Wing arrives, get knocked back into Static Charge; otherwise, you'll go for a not-so-nice flight off the platform.
Raszageth also has a tank swap: Electrified Jaws that deals damage over time and leaves a debuff on your tank, so tanks swap to keep the stacks low. There's also a Volatile Current. Every player gets a blue circle. You need to spread them out. After a short delay, you deal AOE damage and spawn an add. You need to interrupt or crowd-control your add to get rid of it, so everyone should be able to quickly deal with the ad they spawn. You can use AOE stuns or fears or anything to help out other players.
Each platform has three big adds. You need to kill adds one by one as a group. Each add also has a shield. When you break that shield, a bunch of small adds will spawn. Group them up and AOE them down before moving on to the next add.
Throughout the entire phase, Raszageth will also be using Lightning Devastation across both platforms. Thus, when she's hovering above your platform, look for her trajectory and dodge the big lines of lightning.
When your platform is cleared, use the teleporter to the side to hop across to the third extra platform. When both platforms are done, or the Integrity of the Vault gets down to 50 percent, you will enter phase two.
Then you've also got Fulminating Charge. A few targets are marked with a huge blue circle. After a short delay, everyone inside that circle takes a lot of damage, so take these circles out as quickly as you can and try not to hit anyone. Circles start really big, so you will be pushed for space. If someone does get hit, they'll get a smaller circle that they also need to take out. The ability only stops when no one gets hit, but every time someone gets hit, the circle gets smaller, so it does get easier.
But the primary ability in this phase is Stormsurge. Every player will get a positive or a negative charge debuff. Standing near the same debuff gives you massive damage and healing buff but standing near the opposite debuff deals damage, so you want to make two stack points: one positive and one negative, and everyone stacks on their designated marker.
Maximizing your Buffs here is essential because the boss also gains a shield you need to break through. While the shield holds, the boss deals ramping raid-wide AOE damage, and if you fail to break it in time, your entire raid will get a very nasty debuff that lasts for a long time. So you really need to stack properly and break that shield. When the Vault Integrity drops to zero percent, Raszageth flies off again to start the second intermission.
The other primary ability here is Storm Break. The big add teleports away, leaving a bunch of little adds behind. If those little adds get to the big add, they heal it and give it a damage buff. Thus, you need to stun them, slow them, and AOE them down before they reach the big add.
Raszageth will again be doing her Lightning Devastation across the platform, so dodge her lines of lightning when she's zooming across. When you are done on this platform, you'll get knocked back with Storm Nova to the central platform, so be sure to line yourself up correctly.
The other main problem here is the Raging Storm. The edges of the platform are engulfed in a very nasty AOE, and it spreads towards the center of the platform, so as the phase drags on, you get less and less space to work with. Thus, it's a race against the clock: kill the boss before the AOE covers the entire play area.
Raszageth Normal Difficulty
Phase 1
Raszageth's Electric Scales also deal raid-wide AOE damage and additional random damage, so keep everyone topped off. The big combo you need to watch out for is Static Charge and Hurricane Wing. Static Charge is a debuff on a few random players that deals damage over time, but you drop a big AOE on the floor when it expires. You need this AOE for the following ability: Hurricane Wing.
Hurricane Wing knocks everyone back far enough that you'll go off the platform quickly unless you stand in the AOE left behind by Static Charge. So the plan here is to drop all of your Static Charges on the edge of the room and make a safe zone behind your raid. When Hurricane Wing arrives, get knocked back into Static Charge; otherwise, you'll go for a not-so-nice flight off the platform.
Raszageth also has a tank swap: Electrified Jaws that deals damage over time and leaves a debuff on your tank, so tanks swap to keep the stacks low. There's also a Volatile Current. Every player gets a blue circle. You need to spread them out. After a short delay, you deal AOE damage and spawn an add. You need to interrupt or crowd-control your add to get rid of it, so everyone should be able to quickly deal with the ad they spawn. You can use AOE stuns or fears or anything to help out other players.
Intermission 1
Each platform has three big adds. You need to kill adds one by one as a group. Each add also has a shield. When you break that shield, a bunch of small adds will spawn. Group them up and AOE them down before moving on to the next add.
Throughout the entire phase, Raszageth will also be using Lightning Devastation across both platforms. Thus, when she's hovering above your platform, look for her trajectory and dodge the big lines of lightning.
When your platform is cleared, use the teleporter to the side to hop across to the third extra platform. When both platforms are done, or the Integrity of the Vault gets down to 50 percent, you will enter phase two.
Phase 2
Then you've also got Fulminating Charge. A few targets are marked with a huge blue circle. After a short delay, everyone inside that circle takes a lot of damage, so take these circles out as quickly as you can and try not to hit anyone. Circles start really big, so you will be pushed for space. If someone does get hit, they'll get a smaller circle that they also need to take out. The ability only stops when no one gets hit, but every time someone gets hit, the circle gets smaller, so it does get easier.
But the primary ability in this phase is Stormsurge. Every player will get a positive or a negative charge debuff. Standing near the same debuff gives you massive damage and healing buff but standing near the opposite debuff deals damage, so you want to make two stack points: one positive and one negative, and everyone stacks on their designated marker.
Maximizing your Buffs here is essential because the boss also gains a shield you need to break through. While the shield holds, the boss deals ramping raid-wide AOE damage, and if you fail to break it in time, your entire raid will get a very nasty debuff that lasts for a long time. So you really need to stack properly and break that shield. When the Vault Integrity drops to zero percent, Raszageth flies off again to start the second intermission.
Intermission 2
The other primary ability here is Storm Break. The big add teleports away, leaving a bunch of little adds behind. If those little adds get to the big add, they heal it and give it a damage buff. Thus, you need to stun them, slow them, and AOE them down before they reach the big add.
Raszageth will again be doing her Lightning Devastation across the platform, so dodge her lines of lightning when she's zooming across. When you are done on this platform, you'll get knocked back with Storm Nova to the central platform, so be sure to line yourself up correctly.
Phase 3
The other main problem here is the Raging Storm. The edges of the platform are engulfed in a very nasty AOE, and it spreads towards the center of the platform, so as the phase drags on, you get less and less space to work with. Thus, it's a race against the clock: kill the boss before the AOE covers the entire play area.
Raszageth Heroic Difficulty
Phase 1: On heroic adds spawning from each player, now have two charges, so you have to deal with two adds per player, so get creative with those AOE crowd controls. Intermission 1: On heroic mode, when the small adds get tuned low health, they also gain a big haste buff, so finish them off quickly, and you'll also have extra debuffs that you need to spread out with. Phase 2: On heroic mode, standing with the opposite debuff deals AOE damage to everyone around you, so it's even more critical to quickly get to your stack point. Intermission 2: On heroic mode, you'll get two adds in the space, so split your DPS. Make sure the small adds never reach the big ones, and you need to kill them simultaneously, as when one dies, the other one gets a significant buff. Thus, kill them together. Phase 3: On heroic mode, there is another colossal circle debuff in this phase: Magnetic Charge. Take that out of the group, but when it expires, you pull the entire group to you, so get ready to reposition right after.Raszageth Mythic Difficulty
Coming soon…Final Thoughts
To recap, stack up whenever you can in phase one, dodge the swirls, sidestep the Lightning Breath, drop the Static Charge behind your raid, and get knocked back into it during Hurricane Wing. Tank swap for Electrified Jaws, spread out with Volatile Current, deal with your own add, and keep everyone healed. At the end of phase one, split into two groups and get ready to be knocked onto the side platform to kill the big adds. Kill the small adds that spawn, dodge the boss's Lightning Breath, and hop to the next platform when you're done. In Phase two, you keep dealing with most abilities from phase one while running against the blue wave. Run the big circles outside and try not to hit anyone. Mark two stack points for positive and negative buffs and quickly get to your stack point. DPS down the shield quickly as well. For intermission 2, dodge the Ball Lightning, kill the small adds before they reach the big add, and make sure you don't die. In the end, remember to get knocked back onto the central platform. For phase three, almost everything happens at once. Don't stack on the tank. Tanks use cooldowns for Thunderous Blast. Tank swap for the same ability and handle everything you've been doing up until now. On heroic mode, Volatile Current adds have two charges, so two adds per player. The small adds in intermission one are more annoying, and you have circle debuff to spread out with. You get two big adds in intermission 2, so be careful about that. Then a second debuff in the last phase to try and throw you off. Here's everything you need to take down Raszageth in normal, heroic, and mythic modes. So that caps off this set of raid guides. I hope these guides helped you in your raid. Thanks for reading, and good luck! You can also check out the video guide for normal and heroic modes below:More from Wowcarry
We will guide you through the game
April 23, 2024
3 minutes
This blog post provides an analysis of DPS balance on Amirdrassil during the week of April 16th, using data from Warcraft Logs Raid Statistics. It examines the rankings and statistics for different specs and classes, but also mentions the potential biases and limitations in the data. The post aims to give a perspective on the current state of class balance for Dragonflight Season 3.
April 23, 2024
3 minutes
Blizzard announces free character transfers from PvP to PvE realms in Season of Discovery for US and EU players. The transfers will be available periodically throughout the week, allowing players to switch to a ruleset that better suits their preferences. Don't miss out on this limited-time event if you want to migrate your character!
April 23, 2024
4 minutes
This blog post explores the new Earthen Dungeon armor and weapon models in the War Within expansion. It discusses the different sets available, as well as potential updates to the armor colors and future robe options for the cloth set.