Monster Hunter Framer Kits: Three Guardian Scales Each
FFXIV's Monster Hunter Wilds crossover offers two framer kits: Hunter's Monstrous and Hunter's Wild. Each costs 3 Guardian Scales at the Smithy in Tuliyollal (X:13.3, Y:13.0), so collecting both costs six scales. Use the kit items to unlock decorations for both portraits and adventurer plates.
The kits arrived with patch 7.35. Square Enix's crossover page describes The Windward Wilds as a duty without a limited-time window. This is a trial-and-exchange collection route; you do not need to rush an expiring seasonal event. Acquisition and menu details below were checked on October 28, 2026.
| Kit | Price at the Smithy | Design to compare |
|---|---|---|
| Hunter's Monstrous Framer's Kit | 3 Guardian Scales | Dark olive and gold, circular patterns and angular decoration. |
| Hunter's Wild Framer's Kit | 3 Guardian Scales | A parchment book, colored bars, tabs and illustrated emblems. |
Both official item entries list the kits as Unique, Untradable and Market Prohibited. Plan to earn the scales and exchange for the kit on the character whose decorations you want to unlock.
Unlock the Trial, Carve Scales, Then Visit the Smithy
- Meet the quest requirements. Complete the main scenario quest Dawntrail and use a level 100 Disciple of War or Magic, excluding limited jobs.
- Accept The White Wanderer. Speak to the Dawn Hunt Tracker in Tuliyollal (X:13.3, Y:13.1). Follow the crossover quest through its hunt and finish it to unlock the Smithy's Guardian Scale exchange.
- Clear The Windward Wilds and carve before leaving. The normal trial is for eight players, requires an average item level of 725 and has a 60-minute limit. Guardian Scales can be carved from Guardian Arkveld's hide after the fight; make carving part of your reward collection before exiting.
- Exchange the scales. Return to the Smithy at X:13.3, Y:13.0. Buy the exact kit you want for three scales, or both for six, then use each kit item to unlock its embellishments.
The patch 7.35 notes establish the quest prerequisite, trial requirements and carving route. The current kit database entries provide the Smithy's location and exact prices. The Guardian Scale item description also identifies it as material carved from Guardian Arkveld's hide.
Guardian Scales and Extreme Certificates Are Different Rewards
Normal mode supplies the scale route needed for these kits. Extreme is not required just to collect them. The patch notes separately award each Extreme participant a Veldian weapon coffer and two Guardian Arkveld Certificates, with scales available through carving as well. Those certificates are used for Veldian weapon enhancement; they are not the Guardian Scales listed in the kit prices.
Check the number of Guardian Scales you have after carving. The official reward text does not establish a fixed two-scale payout per clear, so a guaranteed three-clear plan for both kits would be misleading.
Compare the Monstrous and Wild Designs
The previews below show the kits' game-element artwork as compiled by FFXIV Collect. They help compare the decorations; your finished portrait or plate depends on the elements and character composition you select in game.
Hunter's Monstrous: Dark Geometry and Gold Detail
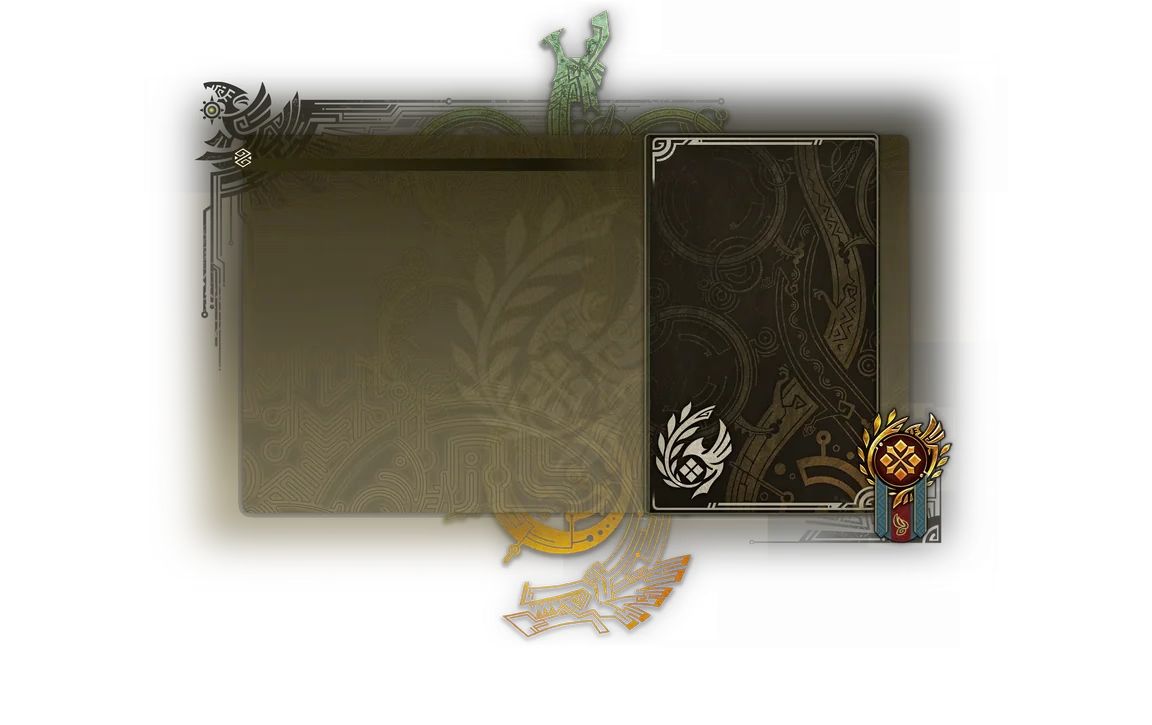
The Monstrous kit preview combines a dark olive field with overlapping circular patterns, a light outline around the portrait area and gold decoration near the lower edge. A green symbol rises above the plate, while the darker palette keeps the larger shapes restrained.
If you want that quieter background, preview it with the character lighting and camera distance you intend to save. Check that dark hair or armor still reads clearly against it. The circular detailing and lower ornament can provide framing without requiring you to use every unlocked element together.
Hunter's Wild: Parchment, Tabs and Colorful Emblems
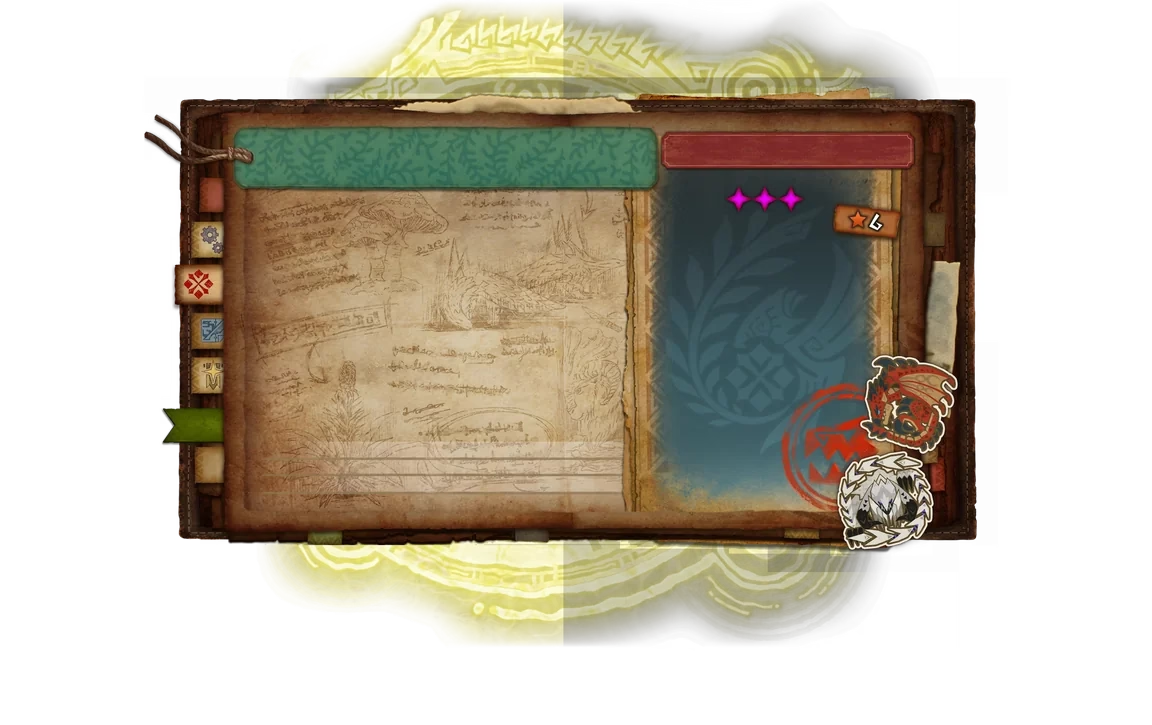
The Wild kit preview resembles an open field journal: brown edging, parchment pages, colored tabs, a teal bar and a red bar. The portrait area has a blue field with illustrated emblems gathered near the lower-right corner.
This is the busier of the two layouts. When placing your character, watch the lower-right decorations and the colored bars so an important part of the pose is not crowded. Try the same pose in both designs before changing the camera; that makes the different framing easier to compare.
What the Kits Actually Unlock
Both official kit descriptions list the same categories of embellishments:
- Portrait elements
Background, Frame and Accent.
- Adventurer-plate elements
Base Plate, Backing, Top Border, Portrait Frame, Plate Frame and Accent.
The distinction matters when customizing. A portrait's background and frame decorate the character image; the plate has its own base, backing and borders around the wider calling card. Buying and using a kit unlocks those options. It does not select a finished combination for every gear set.
Apply the Decorations to Your Portrait and Plate
Create or Update a Gear-Set Portrait
Follow the official portrait workflow:
- From the main menu, open Character, then Portraits.
- Select a registered gear set and choose Edit. Its subcommand menu also offers Edit Portrait. You can create one portrait per gear set.
- Choose the unlocked background, frame and accent you want. Adjust the pose, expression, camera and lighting around the chosen decorations.
- Select Save, close the editor and check the result in the Portraits interface.
Customize the Adventurer Plate Separately
Open Character, then Adventurer Plate. The official adventurer-plate guide directs you to the appropriate menu category for the plate design, portrait, profile and other elements; use Help there for details. Choose the unlocked plate pieces and review the overall layout with your profile information visible.
Instant portraits and the adventurer-plate portrait are separate. An instant portrait is linked to a gear set, while the plate has its own portrait. Check both displays after editing rather than assuming one change has updated everything.
Copy an Instant Portrait onto the Plate
To reuse a finished instant portrait, equip that gear set, open its subcommand menu in Character, Portraits, and choose Apply to Adventurer Plate. Confirm the change. Square Enix's import instructions specify that only the currently equipped gear set's portrait can be imported.
If the import fails, check that the correct gear set is equipped and use Update Gear Set to bring it up to date. If a warning mark appears beside the portrait, edit, update and save it before importing again. Finally, inspect the plate itself: the copied portrait and the surrounding plate decorations are separate parts of the finished design.