Build Your Fight Around Range and an Exit
Punisher applies rifle pressure from a useful angle, switches to the shotgun when a target is genuinely close, and uses cover or prepared movement to survive the return fire. His stationary turret and slower-moving Ultimate make the position you choose as important as the damage you can aim.
The official Punisher profile lists 300 Health and 6 m/s movement speed. The ordinary weapon values below are separate from his selected Team-Up effects. Check which loadout you have equipped before comparing damage or planning an ammunition window.
Start a fight near cover, with your Strategists able to support you and a way to leave the angle. Strafe while tracking a visible target, but avoid wandering out of healing range merely to continue firing. When the target retreats behind solid cover, reassess the angle instead of exposing yourself to chase a disappearing health bar.
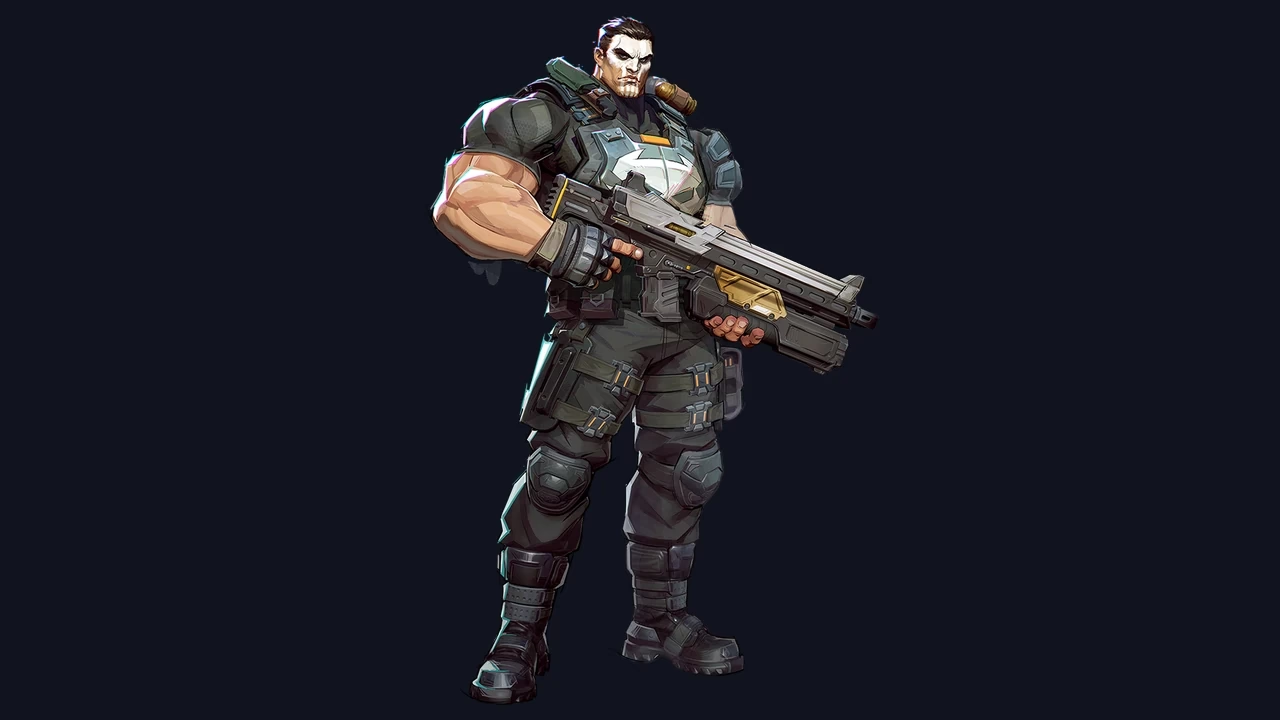
Cover: the official Marvel Rivals Punisher character render, presented on a plain background. Credit: Marvel Games / NetEase Games. It is character artwork, not a gameplay test or an ability demonstration.
Adjudication and Deliverance Have Different Damage Windows
Keep Adjudication for a target the shotgun cannot hit reliably with its pellet spread. Deliverance is the close-range option, with damage falloff starting much sooner. Neither weapon's headline damage is a promise of the damage an enemy will actually take.
| Weapon | Damage and ammunition | Range behavior | Practical use |
|---|---|---|---|
| Adjudication | 19 damage per round; 10 rounds/second; 40-round magazine. | Falloff begins at 20 m and reaches 85% of its damage at 40 m. | Track exposed opponents, hold a supported angle and damage a priority target beyond shotgun range. |
| Deliverance | 16 pellets at 9.5 damage each; 1.43 shells/second; eight-shell magazine. | Falloff begins at 8 m and reaches 40% at 15 m; pellet spread also affects how much connects. | Answer a nearby attacker or finish a close target when the pellets can connect. |
The shotgun's ordinary full-body total is 152 damage: sixteen pellets multiplied by 9.5. That requires every pellet to land before falloff, mitigation or any other modifying condition. Both weapons can critically hit, but partial pellet hits and a distant target make a flat full-shot total a poor prediction.
The November 14, 2025 balance update increased the rifle's maximum-range damage retention from 70% to 85% and increased the shotgun from fourteen to sixteen pellets. The July 10, 2026 update then changed the ordinary damage values to 19 and 9.5. A weapon recommendation needs both changes, alongside the selected Team-Up described below.
Check distance before switching. A player who escapes your shotgun's close window may be a better rifle target even if they have little Health left. Conversely, holding the rifle through a close attack can waste an opportunity to land a more concentrated shotgun hit.
Choose Bestial Hunt or Ammo Overload Deliberately
Punisher's current Team-Up reference presents Bestial Hunt and Ammo Overload. Each choice has a base effect and a partner-dependent enhancement. Read these as separate loadouts rather than adding every listed benefit to the ordinary weapon table.
| Selected loadout | Base effect | Partner enhancement |
|---|---|---|
| Bestial Hunt | Piercing shots with increased weapon damage: Adjudication 20 per round and Deliverance 10 per pellet. | With Daredevil, 40% bonus damage to barriers, helping break enemy summoned walls and shields faster. |
| Ammo Overload | Throw a device with a 25-second cooldown and 5 m effect radius. Within its range, rifle fire rate increases by 35% and shotgun fire rate by 40%. | With Rocket Raccoon, the device also provides infinite ammunition within its effect. |
Bestial Hunt is a passive weapon modification. Its 20-damage rifle and 10-damage pellets belong to that selection; they are not the ordinary values above. Daredevil's numerical enhancement is barrier damage, not an extra projectile-speed statistic.
Ammo Overload creates a position you must be able to use. Place its effect where you have a target, nearby cover and team support. A device in an exposed lane can tempt you to remain there after the position becomes unsafe. Its base firing-rate bonus does not itself grant unlimited ammunition; that is the Rocket enhancement.
How Devil Dinosaur's Primal Punishment Fits
Devil Dinosaur's current profile still documents a mounted interaction through his Primal Punishment loadout. With Punisher present, the pair can request an interaction; accepting it lets Punisher ride him. This is a teammate's selected ability, rather than a third choice in Punisher's own loadout menu.
While mounted, Punisher can use only Adjudication, Deliverance and Scourge Grenade; other abilities are disabled. The enhanced effect lists 25% Damage Reduction and 50% Damage Conversion to Devil Dinosaur. Coordinate the ride with the abilities you intend to use: you cannot plan a mounted turret or Ultimate sequence while those abilities are disabled.
Manage Your Magazines Around Cover and Target Priority
Switching to the other weapon can keep you involved when it has ammunition and suits the new distance. It is not a substitute for checking both magazines. A loaded shotgun helps when a nearby opponent commits; it does not solve an empty rifle at long range.
Use a quiet moment behind cover to prepare the weapon you need next. Check the ammunition you have left instead of swapping on habit alone. If you have no safe shot while reloading, preserving your position may be more useful than switching just to keep firing.
Choose a target whose removal helps the fight. An exposed Strategist may be a valuable shot; a Loki illusion, shield or other deployable may be the immediate obstacle stopping your team from reaching that target. Clear the obstacle when it creates a real opening instead of treating every tank-sized object as a permanent damage assignment.
Also look behind your frontline. If an attacker reaches your Strategists, turning to help can be more valuable than continuing to fire into a defended enemy position. Use the appropriate weapon for that attacker's actual distance and keep a retreat toward friendly support available.
Scourge Grenade Moves You Backward
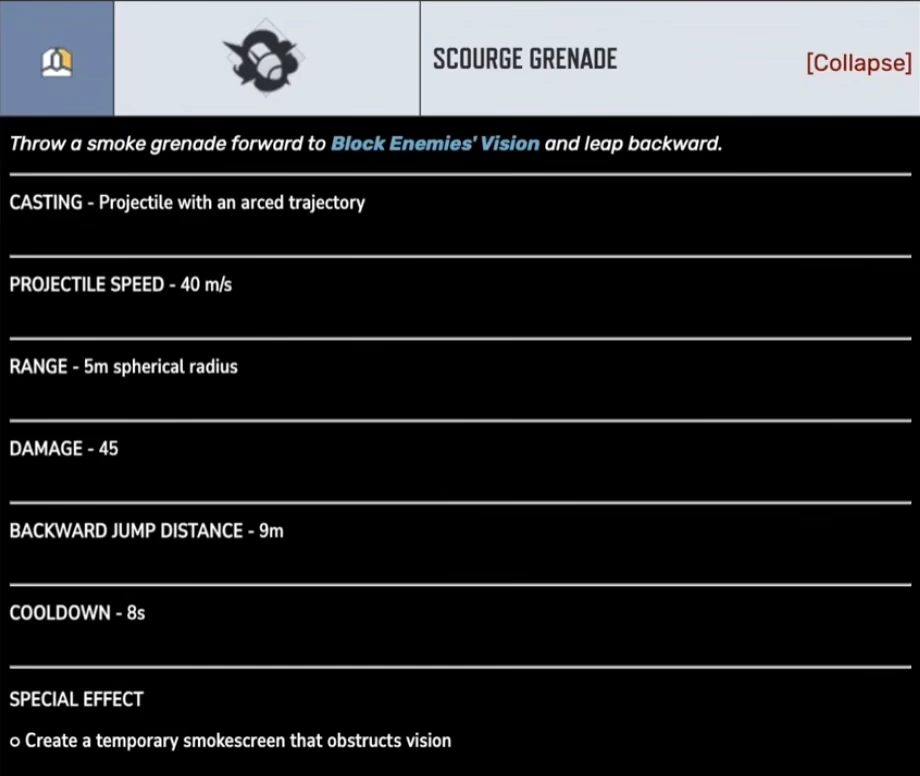
The grenade travels forward; Punisher leaps backward. Its reference values are 45 damage in a 5 m spherical radius, a 9 m backward jump and an 8-second cooldown. It also creates a temporary smokescreen that obstructs vision.
Check the ground behind you before throwing. Aiming the grenade toward a safe landing point does not mean Punisher will leap toward that point. Near an edge, a backward movement without room to land can make the situation worse; treat the grenade as a planned reposition rather than an automatic fall recovery.
Against a close attacker, use the movement to create a new firing angle or retreat toward support. Then reassess the weapon. A nine-meter leap can put the target outside the shotgun's strongest range, so a grenade followed by a rifle response may suit the new distance better than automatically swapping to Deliverance.
Warrior's Gaze retains vision of enemies that disappear from view for three seconds, within its 30 m range. That short window can help you track an opponent while repositioning. It is not an unlimited reveal of enemies across the map, and throwing a grenade does not start a fresh three-second tracking timer on every opponent.
Prepare Vantage Connection Before You Need It
Vantage Connection fires a hook to create a cable. The official reference lists a 5-35 m cable length, 25 m/s travel speed and a 20-second cooldown. Use the cable interaction shown by your controls; the profile's PC binding is F.
Choose the destination as carefully as the starting point. A useful cable connects a supported firing position with cover, high ground or a safe return route. A fast journey into the enemy backline is still a dangerous arrival if your team cannot follow or support you.
- Rollout: connect useful terrain so you can reach a firing angle without spending the entire approach in an open lane.
- Retreat: prepare a route before the enemy closes, then leave while the destination is still safe.
- New angle: reposition when a shield or solid cover makes your current lane unproductive, rather than repeatedly challenging the same defended sightline.
Look at both ends before committing and reconsider the route as the objective moves. Keep track of the connection you intend to use and its cooldown, especially after the fight changes location.
Culling Turret Protects the Front and Commits Your Position
Culling Turret holds Punisher in place and blocks damage from the front. That makes its firing direction, cover and exposure to other angles central to the decision to deploy. Choose a position where your team can support the hold and where a flank will not reach you unnoticed.
The turret has 600 Health, 200 ammunition and a 20-second cooldown. It fires at 12.5 rounds per second. Its shots have separate 10 direct damage and 10 explosion damage components, with a 3 m explosion radius.
Use direct hits when you have a clear target, and account for the blast when enemies cluster. Splash near several opponents can be useful, but it should not replace aiming at a vulnerable target merely because the fire rate is high. The turret's spread tightens after ten and twenty shots, another reason to maintain deliberate tracking.
Watch the fight beyond your crosshair. If an enemy reaches another angle, the objective moves, or your team retreats, abandon the exposed hold and reposition. Front protection is not a reason to treat the turret as all-direction safety or to commit it as a guaranteed answer to every enemy crowd-control ability.
Against a barrier holding a choke, turret pressure can help open the lane when the position is supported. If the enemy simply steps behind solid cover, do not stay planted solely to empty the magazine. The value comes from the space your team can use, not from firing for its own sake.
Give Final Judgement a Firing Lane Before Activating It
Use the Ultimate when opponents are committed to a space you can actually shoot and your team is ready to follow. Starting in an exposed position leaves you dealing with its movement penalty while enemies have room to flank or retreat. A defensive enemy ability or available escape can also change which target is worth pursuing.
| Part of the Ultimate | Official reference |
|---|---|
| Duration and ammunition | 10 seconds; infinite ammunition. |
| Movement penalties | 10% slower while idle; 30% slower while shooting. |
| Gatling guns | 8 damage per round at 33.33 rounds/second. Falloff starts at 20 m and reaches 70% at 40 m. |
| Missile volleys | 50 damage per missile; up to eight missiles per volley, with three seconds between volleys. |
| Missile locks | Maximum three locked-on missiles per target; maximum locking distance 40 m. |
The eight-missile volley is not a promise that one target receives all eight. Keep the lock limits, target visibility and available cover in mind. The Gatling spread also narrows after fifty and one hundred shots; track the target rather than sweeping randomly across the entire enemy formation.
If you need a short adjustment, releasing the trigger reduces the movement penalty from 30% to 10%. The ten-second Ultimate window continues running while you reposition. Use that option to preserve a useful angle, rather than expecting a pause to extend the ability's duration.
Concentrate fire where your team can convert it into a takedown or an objective opening. Do not assume Final Judgement automatically defeats every healing Ultimate or defensive response. If the enemy escapes behind cover, reassess what remains visible instead of walking into danger to protect a damage opportunity that has already disappeared.
Handle Dive, Shields and Long Sightlines
Against long-range pressure, reduce the time you spend crossing an open lane. If a Hawkeye is holding that lane, use terrain and a prepared rotation to change the engagement. A turret or Ultimate used in the same exposed spot gives the enemy a predictable position to punish.
Against a close attacker, keep support in reach, track the approach and use shotgun or grenade movement according to distance. Do not spend both your positional advantage and retreat option on a chase while your Strategists are under pressure.
Against a shielded position, compare a supported damage window with the cost of standing there. Your selected Team-Up may help break barriers; a different angle or helping a teammate remove the defender can be the more useful decision. These are fight decisions, not a guarantee that one named hero always wins the matchup.
For practice, work on one repeatable problem at a time: track a moving target while strafing near cover, compare rifle and shotgun results at different distances, then rehearse grenade direction and cable landings in a safe setting. Bring that habit into matches by asking where your next shot and your next exit will be. Repeat the sequence until you can track the target, your ammunition and your exit together.