Danders Frames Addon Guide: Raid and Party Frame Setup
How to set up the Danders Frames addon for raid and party healing in WoW Midnight, from the /df menu and profiles to click casting and Auto Layouts.
By:
John Langan
Danders Frames is a party and raid unit-frame addon built for World of Warcraft: Midnight, and it has become a common pick for healers who want their frames to do exactly what they ask. It is flexible enough to be intimidating on the first launch, so this guide walks through setup in the order you actually need it: open the menu, build a party layout, copy it to raid, then tune the parts that matter when healing gets busy. Healers who run organized content can also browse our WoW raid runs if they would rather practice a polished setup inside a coordinated group.
Danders Frames is built specifically for WoW Midnight and updates alongside each patch, so the steps here match the current version.
Type /df to open the main menu. The first task is profiles. Danders Frames supports profiles with per-specialization auto-switching, so you can keep one configuration for a healing spec and another for a damage spec and let the addon swap between them on its own.
Set up your party frames before anything else, since party content is where you will tune the small details. Once the party layout feels right, use the copy-to-raid function to transfer settings such as auras and debuffs straight to your raid frames. That single step saves rebuilding the same layout twice.

Keep profile creation under control from the start. The addon can spin up a new profile for each talent build, which clutters the list fast. If you do not need a separate layout per build, disable that behavior and reuse a handful of deliberate profiles instead.
With profiles sorted, move to the look of the frames. Frame height and width are fully adjustable, so you can size your party and raid frames to fit your screen and your healing range. Global fonts and group labels live in the same area, and if you run a companion addon such as Enhance QoL (EQOL) you can add resource textures like a Rage or Holy Power bar to the frames.
Color settings cover the rest. You can drive health bars by class color, apply gradient health bars, and assign custom colors to the elements you want to stand out. The goal is a frame you can read at a glance during a heavy pull, so favor contrast over decoration.
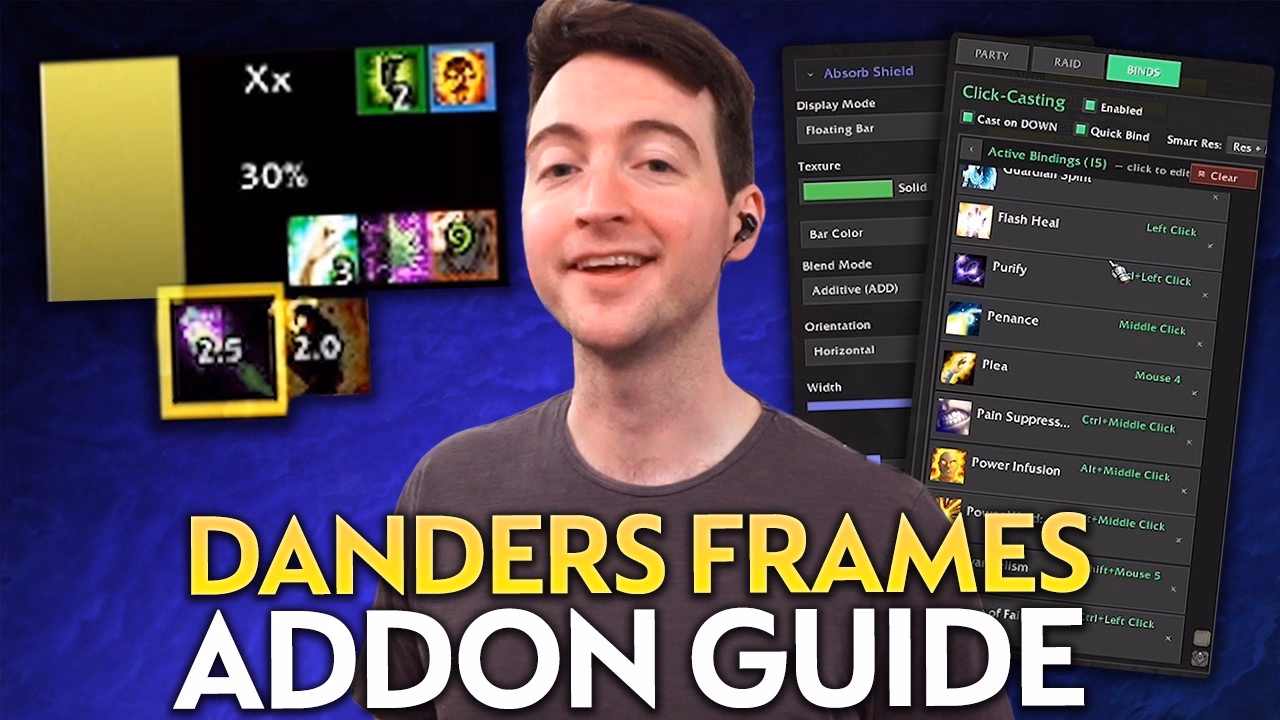
Test Mode, opened with /df test, is the feature you will lean on most while building a layout. It simulates health, absorbs, auras, dispels, and range so you can see how a change behaves without zoning into a raid. When you select an option such as heal prediction, the menu shows the settings tied to it, including anchor positions, blending, and color.
✏️ Tune every layout change inside Test Mode first. Frames look different when they are full of simulated auras and absorbs than they do empty, and catching a cramped layout here beats discovering it mid-pull.
Danders Frames has built-in Click Casting, which binds spells and macros directly to mouse buttons on your unit frames. It supports both mouse-button casting and keyboard casting, and the bindings save into per-spec profiles so a healing setup and a damage setup do not collide.
If you keep a resurrection spell bound, the addon resolves it to the right cast for the situation, using a mass resurrection out of combat and a battle resurrection in combat. Check the binding in the in-game menu so you know exactly which key triggers it before you rely on it in a pull.
Midnight changed how addons can behave in combat through its updated addon API, and Danders Frames reflects that in how defensive cooldowns are displayed. The addon gives defensive cooldowns a dedicated display, so when an ally presses something heavy like Guardian of Ancient Kings or Pain Suppression, you can see it without hunting through a stack of buffs. Leave enough room in the layout for those displays to read clearly.
Absorb tracking sits alongside it. A positive absorb can show as a floating white bar above the health bar, which makes a shield easy to spot at a glance. You can instead attach absorbs directly to the health bar, though that can hide overshielding, or use an overlay to keep the bar clean. Custom colors per absorb type help you tell one shield from another during combat.
📌 The common mistake here is cramming too much onto the frame. If the defensive display, absorb bar, and aura icons all fight for the same space, none of them read fast enough to act on. Give the elements you check most a clear lane.
Aura tracking runs through the Aura Designer. For buffs, you decide how many show at once, control their order where the system allows, and adjust borders and duration text so a buff that needs refreshing stands out. Expiry notifications flag auras that are about to fall off.
Debuffs work in fixed slots, often the top-right corner, with adjustable growth direction and icon limits. Blacklist settings filter out the noise, so in practice you rarely watch more than two or three at once. Boss debuffs get their own handling, since clear borders matter most when a dispel overlay is missing.
You can also highlight an active buff on a frame, for example a green border when Atonement is up. The indicator flags that a buff is present rather than naming the exact spell, which is enough for most healing decisions even though finer per-spell tracking is still limited.
Two utility features round out a healing layout. Pinned Frames let you pull specific players into their own prioritized group, which is useful in a raid when you want the tanks or a fragile damage dealer always in the same easy-to-reach spot. The frames auto-populate by role, so the setup holds up across pulls.
Click-through icons solve a smaller but persistent annoyance. When buff or debuff icons sit on top of a frame, a click meant to heal can land on the icon instead. Setting those icons to click-through routes the click to the unit frame underneath, so a heal goes where you aimed it. For a click-casting healer, that is the difference between a clean cast and a wasted global.
Sorting keeps raid frames predictable. You can set custom priorities by role or class and choose to always place yourself in a fixed spot, which makes self-targeted casts faster because your frame never moves.
Auto Layouts handles the rest automatically. It swaps your raid frame configuration by content type and group size, so a five-player layout and a twenty-player layout each load the way you set them. This ships as a live feature, so you do not need to rebuild frames by hand when you change content. Many healers keep vertical frames for dungeons and horizontal frames for raids; with per-spec profiles and Auto Layouts together, the addon loads the right one for you. If you want to test a dungeon layout under real pressure, you can explore Mythic+ dungeon carries and watch how the frames hold up in a timed key.
Once a layout works, you can export it as a settings string for a friend, or import someone else's. Danders Frames accepts an import string and also supports pulling a Wago profile, the import strings hosted on wago.io. Imports can be selective, so you can bring in a section of a configuration without overwriting the parts you have already tuned. Paste the string into the import option, parse it, and choose what to apply.
⚠️ Importing a full profile overwrites your current one. Export your own setup first so you have a save point, then import selectively rather than wholesale until you know the new layout suits how you heal.
The addon is available on CurseForge, and for the steps above the fastest path is to install it, run /df, build a party layout, copy it to raid, and spend ten minutes in Test Mode before your next group. Wowhead's raid-frame addon roundup, linked in the FAQ below, is a useful second reference if you want to compare it against other unit-frame options.
The main menu opens with /df. Test Mode opens with /df test, and it simulates health, absorbs, auras, dispels, and range so you can preview a layout outside of combat.
Build your party frames first, then use the copy-to-raid function in the menu. It transfers settings such as auras and debuffs to your raid frames, so you do not have to rebuild the same layout twice.
Yes. Click Casting is built in and binds spells and macros to mouse buttons, with support for keyboard casting as well. The bindings save into per-spec profiles, so a healing layout and a damage layout keep separate keybinds.
No. Auto Layouts is a live feature. It swaps your raid frame configuration automatically by content type and group size, which removes the need to rebuild frames by hand when you change content.
Open the import option, paste the settings string from wago.io, and parse it. Imports can be selective, so export your own setup as a backup first, then choose which parts of the imported profile to apply.
Enhance QoL (EQOL) is a separate quality-of-life addon. It is not required for Danders Frames, but it can add resource textures such as a Rage or Holy Power bar to your frames if you want them. Danders Frames works fully on its own without it.
Yes. The Aura Designer handles boss debuffs separately from normal debuffs, with clear borders that help when a dispel overlay is missing. Blacklist settings filter out lower-priority debuffs so the frame stays readable.
For a wider look at unit-frame and raid-frame options, see Wowhead's raid-frame addon roundup.
Last reviewed 2026-05-21 against Patch 12.0.5 Lingering Shadows. Maintained by WowCarry's WoW team.