Key Takeaways
- Temple of the Jade Serpent is not in the WoW Midnight Season 1 Mythic+ pool. It last ran in Dragonflight Season 1 and serves today as a historical reference for returning players and Classic enthusiasts.
- The dungeon had four bosses in a mostly linear layout: Wise Mari, Lorewalker Stonestep (Strife and Peril), Liu Flameheart, and Sha of Doubt. The final two only unlocked after the first two were dead.
- Interrupt discipline was the primary execution lever. Haunting Scream (fear on all players) and Defiling Mist (stacking disease) were wipe risks if missed.
- Wise Mari's Corrupt Droplets could not be interrupted. They had to be stunned and burned immediately to prevent overlapping Splash AoE.
- The Lorewalker Stonestep encounter punished sloppy tank swaps hard. Letting either boss reach 10 stacks of Intensity triggered a 15-second immunity window and a heavy damage spike.
- Sha of Doubt's Touch of Nothingness required instant dispel every time. Chain spread to the full group was a reliable wipe.
- The dungeon's mandatory enemy count was fully covered by boss-path trash. No heroic or optional pulls were needed to reach 100%.
The sections below cover each boss in full detail, with trash priorities, affix notes, and historical context for Dragonflight Season 1.
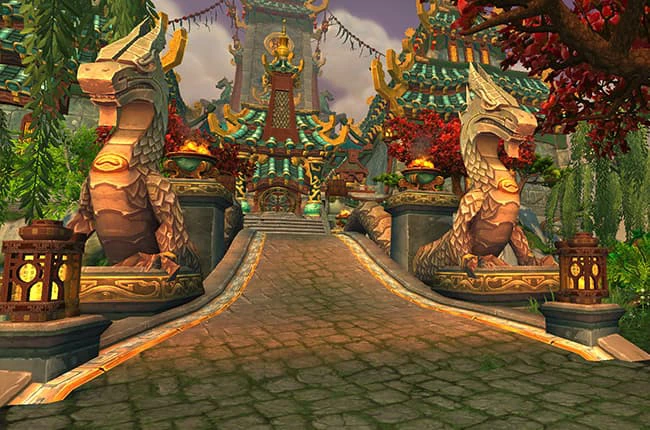
Overview: Temple of the Jade Serpent in Mythic+
Temple of the Jade Serpent was introduced in Mists of Pandaria as one of the expansion's flagship five-player dungeons. During Dragonflight Season 1 it returned to the Mythic+ rotation as a legacy pick, bringing its four-boss gauntlet and distinctive Pandarian aesthetic back into competitive keystone play.
As of WoW Midnight patch 12.0.5 "Lingering Shadows", the dungeon is not part of the active Mythic+ pool. The Midnight Season 1 rotation runs: Maisara Caverns, Nexus Point Xenas, Windrunner Spire, Algeth'ar Academy, Magister's Terrace, Seat of the Triumvirate, Skyreach, and Pit of Saron. If you are looking to push keys today, browse current Mythic+ dungeon boosts for the active season instead.
This guide documents Jade Serpent as it played during its last active Mythic+ season, for players running it in MoP Classic Challenge Mode, revisiting it for achievement work, or researching its encounter design.
📌 Common mistake: Assuming Temple of the Jade Serpent is in the current Midnight Season 1 pool. It is not. All mechanics below reflect its Dragonflight Season 1 iteration, which matched the original encounter design.
Dungeon Layout and Route
The dungeon followed a largely linear path with limited skip opportunities. The standard Mythic+ approach moved as follows:
- The tank pulled left through the entry courtyard toward Wise Mari, scooping all path trash using movement cooldowns and taunts. An assigned interrupt order for the first corridor was set before the pull.
- After Wise Mari fell, the group cleared the library section toward Lorewalker Stonestep. This corridor was the most interrupt-dense stretch of the run.
- Defeating both Wise Mari and Lorewalker Stonestep unlocked the gates to Liu Flameheart and Sha of Doubt. There was no skippable route to the final pair.
- Liu Flameheart and Sha of Doubt were cleared in sequence to complete the dungeon.
The mandatory enemy count from all four bosses and associated path trash was sufficient to reach 100% without optional or heroic pulls. Community-optimized routes from the Dragonflight S1 season were published on Keystone.guru and remain searchable there for players researching the dungeon's historical layout.
Trash Pack Priorities and Interrupt Order
Interrupt discipline was the primary execution requirement throughout the dungeon. The following priority order applied across both the entry courtyard and the library corridor:
- Haunting Scream: fear on all players; a missed interrupt in a narrow corridor was a near-certain wipe in high Mythic+ keys.
- Defiling Mist (Depraved Mistweaver): stacking disease/debuff that compounded healer strain across the pull.
- Tidal Burst (Corrupt Manifestation): moderate AoE to all players; not a wipe by itself but added significantly to healer load.
- Hydrolance: moderate single-target damage; lower priority than the above but a free interrupt when the GCD allowed.
- Lore Blast (library section): lowest priority; purely a DPS loss if ignored.
Uninterruptable Abilities: Control Required
- Corrupt Droplets / Splash: could not be interrupted; stuns were the only mitigation. Droplets had to be stunned immediately on spawn and burned before Splash damage stacked. Under the Sanguine affix these spawns left persistent puddles in the Wise Mari fountain room, compressing usable space quickly.
- Leg Sweep: could not be interrupted; required a stun applied before it fired or the entire group was stunned for six seconds.
✏️ Technique tip: Assign kicks on a rotating cooldown basis before the first trash pull, not reactively. The library corridor before Lorewalker Stonestep had multiple casters active simultaneously — a reactive interrupt rotation broke down fast at higher key levels.
Boss Guide: Wise Mari
Wise Mari was the dungeon's opening boss and a sharp wake-up call for tanks unfamiliar with the encounter. The fight combined a lethal frontal with add management that punished any pause in burst DPS.
Key Mechanics
- Wash Away: a frontal water jet with one-shot potential at any key level. The tank kept Wise Mari faced away from the group at all times, repositioning on every movement by the boss.
- Corrupt Living Water: a water elemental add that spawned during the fight. Killing it split it into three Corrupt Droplets. The Droplets cast Splash (an AoE that could not be interrupted) and had to be stunned and burned immediately.
- Water Bubble: the boss became immune and knocked back any player who touched the bubble. The group stepped back during the phase and waited it out.
Execution Notes
- One DPS was assigned ahead of time as the Corrupt Droplet handler — that player immediately peeled off boss DPS to pick up and burn the Droplets on spawn.
- Wash Away was a wipe if it clipped multiple players. Tank positioning was non-negotiable.
- Overlapping Splash casts from multiple live Droplets spiked group-wide damage sharply. Under the Sanguine affix, dead Droplets left puddles that restricted movement in the fountain room across the entire fight.
⚠️ Warning: Never attempt to kick Corrupt Droplet Splash — the ability is immune to interrupts. Using a kick on it consumed a cooldown with no effect while the actual interrupt-able cast (Tidal Burst or Haunting Scream) went through unchecked.
Boss Guide: Lorewalker Stonestep (Strife and Peril)
Strife and Peril were the dungeon's second encounter, introduced by Lorewalker Stonestep. The fight required simultaneous tank management of both targets with precisely timed DPS swaps, a coordination test that separated disciplined groups from chaotic ones.
Key Mechanics
- Intensity: each boss accumulated stacks whenever it took damage. At 10 stacks the affected boss became immune for 15 seconds and dealt heavy damage to the group. Stacks fell off through Dissipation when the boss was not being attacked, but Dissipation alone could not compensate for sloppy swaps.
- Agony: a shadow DoT applied to a player. Healers managed this with consistent output rather than emergency throughput.
- Lore Blast: a minor AoE cast that was interruptible and worth kicking whenever the GCD allowed.
Execution Notes
- A designated caller issued swap commands so both bosses tracked roughly equal Intensity at all times. Visual UI elements on the bosses' nameplates made this manageable with WeakAuras.
- Leaving either boss completely untouched for too long caused Dissipation to fall behind the damage intake from Agony DoTs stacking on the healer.
- The Spiteful affix made the narrow library corridor that preceded this encounter particularly dangerous — Spiteful shades spawned from killed trash and tracked players into the boss room if the pull was not managed cleanly.
📌 Common mistake: Over-focusing one boss to push it through faster. Driving either Strife or Peril to 10 stacks of Intensity triggered the immunity window at the worst possible time, usually when the healer was already stretched by Agony. Even stacks on both bosses was always the correct approach.
Boss Guide: Liu Flameheart
Liu Flameheart was a three-phase fight gated behind the deaths of both Wise Mari and Lorewalker Stonestep. The encounter escalated through increasing movement demands, with a high-pressure transition into Phase 3 when Yu'lon manifested.
Phase Breakdown
- Phase 1 (100–70%): Serpent Strike applied a DoT to the tank; the healer dispelled it promptly to prevent compounding mana costs. Serpent Wave created three lines of ground fire that required clean dodging.
- Phase 2 (70–30%): Jade Serpent Dance — the same mechanics returned at a faster cadence. Groups that established clean positioning habits in Phase 1 handled this cleanly.
- Phase 3 (<30%): Yu'lon manifested and the boss transformed into the Jade Serpent, frequently casting Jade Fire. Targeted players dropped green fire pools on the ground. This was the heaviest damage window of the fight.
Execution Notes
- Phase 3 required constant movement. Players who stood still dropped Jade Fire pools in the center of the room and quickly ran out of safe space.
- Dispelling Serpent Strike on the tank immediately in Phase 1 and Phase 2 prevented the DoT from stacking healer mana costs into Phase 3.
- Raid/group defensive cooldowns were saved for the Phase 3 transition, which spiked group damage sharply before healers could establish a rhythm.
✏️ Technique tip: In Phase 3, move in wide arcs around the room's perimeter rather than darting unpredictably toward the center. Perimeter movement kept Jade Fire pools pushed to the edges and preserved clean lane space for the full group.
Boss Guide: Sha of Doubt
Sha of Doubt was the dungeon's final boss and its most mechanically demanding coordination check. The fight had a low execution floor: a single missed dispel or a slow add response ended the run.
Key Mechanics
- Bounds of Reality: the boss channeled, became immune, and spawned a Figment of Doubt clone of each player. The clones used basic abilities and had to be killed before the channel ended. Clones that survived the channel caused a wipe in higher key levels.
- Touch of Nothingness: a heavy DoT on a random target. If the target was standing near other players when the DoT spread, it chained immediately. The healer dispelled this on detection without waiting for a second tick.
- Figment of Doubt adds: each clone inherited the visual appearance of a player's class and spec. Every DPS burned their own clone the moment Bounds of Reality was cast.
Execution Notes
- The group maintained moderate spread throughout the fight, enough that a Touch of Nothingness landing on one player did not immediately reach a second.
- Every DPS had one job during Bounds of Reality: locate their own Figment clone and kill it. Targeting the boss or another clone was a common and fatal error.
- The healer pre-positioned a dispel macro for Touch of Nothingness. The ability landed without warning, and any delay in dispelling increased chain-spread risk exponentially.
⚠️ Warning: Under the Afflicted affix (historical Dragonflight S1 context), Touch of Nothingness and Afflicted Souls landing simultaneously created a dispel-ordering crisis for solo-healer groups. The established triage was to dispel Touch of Nothingness first — the chain-spread risk outweighed the Afflicted debuff penalty in every scenario.
Historical Affix Interactions
These notes reflect Dragonflight Season 1 affix combinations observed during the dungeon's active Mythic+ period. No current affix data applies; the dungeon is not in the Midnight Season 1 pool.
- Sanguine was the most punishing affix for this dungeon. Corrupt Droplet deaths in Wise Mari's fountain room left persistent puddles that compressed usable space throughout the fight, especially on high keys where Droplets spawned frequently.
- Bursting and Incorporeal were considered manageable due to the dungeon's linear layout, which gave groups natural breathing room between encounters.
- Afflicted increased healer strain significantly on Sha of Doubt due to the overlap between Afflicted Souls and Touch of Nothingness timing.
- Spiteful was dangerous in the narrow library corridor before Lorewalker Stonestep. Shades spawned from killed trash tracked individual players into tight spaces with limited kiting room.
For the active season's affix schedule and current Mythic+ dungeon pool, browse current Mythic+ dungeon boosts on WowCarry.
Temple of the Jade Serpent in WoW Midnight
Temple of the Jade Serpent is available in MoP Classic as a Challenge Mode dungeon, which preserves the original encounter design at a fixed item level scaling. For live retail WoW players, the dungeon sits outside the current season — if you want to run it for transmog, achievements, or nostalgia, it is accessible as a regular dungeon at any difficulty.
The Midnight Season 1 Mythic+ pool (active as of patch 12.0.5) runs eight different dungeons entirely. Players looking to progress in the current season or push keystone ratings can explore Mythic+ dungeon carry services for the active pool. For players also working on current raid content alongside keys, the see WoW raid boost options page covers all current Midnight tier content including Sporefall.
Frequently Asked Questions
Is Temple of the Jade Serpent in the Mythic+ pool in 2026?
No. As of WoW Midnight patch 12.0.5 "Lingering Shadows" (June 2026), Temple of the Jade Serpent is not part of the active Mythic+ rotation. It last appeared in Mythic+ during Dragonflight Season 1.
What is the boss order in Temple of the Jade Serpent?
The four bosses in order were: Wise Mari, Lorewalker Stonestep (a two-target fight against Strife and Peril), Liu Flameheart, and Sha of Doubt. Liu Flameheart and Sha of Doubt were locked behind gates that only opened after both Wise Mari and Lorewalker Stonestep were defeated.
What were the most dangerous mechanics in the dungeon?
Wise Mari's Wash Away (frontal one-shot potential), Haunting Scream from trash (wipe-level fear if missed), Sha of Doubt's Touch of Nothingness (chain spread wipe), and the Corrupt Droplet Splash overlaps were the highest-lethality mechanics. Lorewalker Stonestep's 10-stack Intensity immunity was an execution failure rather than a wipe mechanic, but it cascaded into wipes at high key levels when paired with Agony DoTs.
Can Corrupt Droplets be interrupted?
No. Corrupt Droplets cast Splash, which was immune to interrupts. The correct response was to stun the Droplets immediately on spawn and burn them as fast as possible to minimize the number of Splash casts going out simultaneously.
How do you handle the Lorewalker Stonestep encounter?
Strife and Peril both accumulated Intensity stacks when they took damage and went immune at 10 stacks. The group attacked both bosses in alternating windows, keeping their stacks roughly equal. A designated caller managed the swap timing. Dissipation reduced stacks when a boss was ignored, but it was not fast enough to compensate for a swap cadence that fell apart.
What was the trickiest trash pull in the dungeon?
The library corridor before Lorewalker Stonestep. It contained multiple casters with high-priority interrupts active simultaneously — Defiling Mist, Haunting Scream, and Lore Blast could all be in the air at once. Reactive interrupt assignments failed reliably at this pull; a pre-assigned rotation was required.
Is Temple of the Jade Serpent available in MoP Classic?
Yes. The dungeon is available in MoP Classic as a Challenge Mode instance, which uses fixed item-level scaling and replicates the original encounter design. The mechanics documented in this guide are accurate to that version.
Where can I find optimized routes for Temple of the Jade Serpent?
Keystone.guru hosted community routes from the dungeon's Dragonflight Season 1 run. Search for "Temple of the Jade Serpent" on keystone.guru to find historical route layouts from that season.
Last reviewed 2026-06-17 against Patch 12.0.5 Lingering Shadows — Maintained by WowCarry's WoW team.