Key Takeaways
- Stormgarde and Ar'gorok were the highest-yield popular drop zones, large enough for multiple teams but contested enough to matter for XP lead early.
- The left side of the Arathi Highlands map (west and central) offered stronger rotations than the right side; Hammerfall's slow rotations made it a trap for players who landed there expecting easy progression.
- Go'shek Farm sat centrally on the map but drew too many players for the loot available — contested without the payout to justify the risk.
- Circle of Elements and Ar'gorok Mine were the most underrated green-tier drops: central location, elite density, and multiple rotation paths out.
- Witherbark Village was the consensus worst drop — spread-out mobs with CC totems and ranged spells, no good exits, and nothing to do once cleared.
- Southern River was a hidden pick not marked on the in-game map, but it offered elites and blue/purple chests that accelerated ability progression in the first few minutes.
- Experience lead in the first two minutes of a Plunderstorm match determined your ability power ceiling heading into mid-game — drop location choice carried more weight than in most battle royale formats.
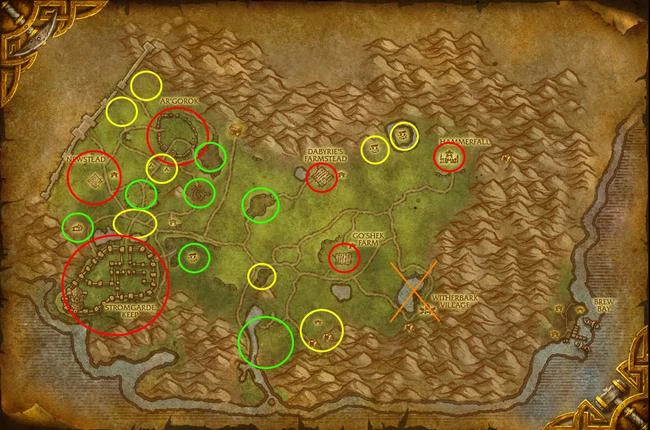
With those priorities in mind, here is how each drop zone on the Arathi Highlands map performed across the event's run.
Why Drop Location Mattered More in Plunderstorm
Plunderstorm, the limited-time battle royale event set in the Arathi Highlands, tied character power directly to experience earned from mob kills and chests. Falling behind on experience in the first two minutes cut a player's ability ceiling for the rest of the match — a disadvantage that snowballed faster than in most battle royale formats. Mobs granted both loot and XP; choosing a location with high mob density and efficient rotations out of the area separated the first-circle survivors from the early eliminations.
Popular Drop Locations
These locations offered the highest mob density and loot volume, but drew the most player competition. Each required a willingness to fight immediately after landing:
| Drop Location | Description |
|---|---|
| Stormgarde | The largest point of interest on the map, with enough space for multiple teams to claim separate sections. Intense fights broke out after each team cleared its corner. Strong rotation options made leaving Stormgarde flexible — north, south, or east were all viable depending on the circle. |
| Newstead | A smaller area with solid mob and loot density. Players who cleared Newstead cleanly could rotate south to the graveyard, where gold chests appeared reliably for an extra ability boost. |
| Ar'gorok | Known for its concentration of rare elites and tower loot. Popular but large enough that multiple teams could share the zone without immediately colliding — the tower rares were the priority targets. |
| Dabyrie's Farmstead | Light on loot compared to other popular drops, but drew players who wanted early PvP engagement. Viable if winning early fights was the goal; not ideal for players prioritizing experience lead. |
| Hammerfall | Rare and loot-dense, similar to Ar'gorok, but situated on the right side of the map where rotations were slow and open-world solo mobs were the only nearby option after clearing. Players who landed here often found themselves falling behind on XP during the mid-game transition. |
| Go'shek Farm | Centrally located and consistently the hottest landing zone on the map. The concentration of players regularly exceeded the available loot and mob density, making it a high-risk, lower-reward drop compared to Stormgarde or Ar'gorok. |
Each of these locations rewarded players who secured the area quickly and transitioned out before the second wave of players arrived looking for stragglers.
Good Drop Locations
These locations offered a strong balance of mob density, loot availability, and rotation flexibility with lower player competition than the popular tier:
West Lumber Mill
Two elite mobs plus a solid number of regular mobs made this a reliable XP source. Multiple chests typically spawned in the surrounding area, and the rotation west or toward the central map was straightforward from this position.
Horde Outpost on Hill
Moderate mob density with elite spawns and chest locations. The hill position gave a clear view of approaching players, and rotation options covered north, south, or east depending on the circle pull — one of the more flexible green-tier drops.
Ar'gorok Mine
One of two mines on the map and consistently underrated. The Ar'gorok Mine combined chest density, elites, and a reasonable number of regular mobs in a compact space, letting players clear it efficiently before rotating toward the central zone or Ar'gorok itself.
Circle of Elements
An excellent central drop with elite density and strong mob counts. The central map position offered rotation flexibility in any direction after clearing, making it one of the safest green-tier drops for players who wanted to preserve options heading into the mid-game.
Stormgarde Mine
Similar to Ar'gorok Mine in structure — consistent elite and chest supply in a contained area, with a clean rotation path toward Stormgarde if the main compound was already contested.
Southern River
Not marked on the in-game map, but a strong hidden pick. The river corridor reliably spawned elites and blue/purple rarity chests that accelerated ability progression in the critical first two minutes. Players who knew about it faced little competition and entered mid-game ahead of the curve.
Alliance Camp
Below the green-tier average in mob density and loot, and slightly isolated from other nearby drop points. Worth considering only when the better green-tier locations were taken, and rotation options needed careful planning from this position.
These locations collectively represented the most consistent path to a strong mid-game transition without the immediate PvP risk of the popular drop tier.
Okay Drop Locations
These locations were workable but carried clear limitations in either loot density, rotation options, or both:
North-West Corner
A few elites but mobs spread thin across a wide area. Rotating out was limited to Ar'gorok as the only strong nearby option, reducing flexibility during the mid-game circle transitions.
Western Camps
Both camps offered a serviceable number of elites and mobs. In matches where other players avoided the western side entirely, these spots could be claimed cleanly for a quiet early game — but they offered no standout advantage when contested.
North-East Elementals
High elite count, but elemental attacks dealt substantial damage and were difficult to dodge for newly landed players with weak abilities. After clearing, the north-east corner offered limited rotation options, leaving players in a poor position heading into the mid-game.
Southern Ogres
A passable early drop with limited upside. Once the ogres were cleared, nearby options were scarce unless the Southern River zone was unclaimed — in which case combining both gave a stronger result than either alone.
Players who landed in okay-tier zones typically needed to rotate aggressively by the first circle to avoid falling too far behind on ability levels.
Location to Avoid
Witherbark Village was the consensus worst drop in Plunderstorm. Mobs spread across a large footprint, individual enemies cast CC totems and ranged spells that punished players with limited ability options at the start of a run, and clearing the village left no strong rotation path. Players who dropped here routinely entered the mid-game behind on both XP and ability level with no good way to recover.
Frequently Asked Questions
What was the best drop location in Plunderstorm overall?
Stormgarde was the strongest popular-tier drop due to its size, mob density, and rotation flexibility. For players who preferred less contest, Circle of Elements or Ar'gorok Mine offered the best balance of XP output and multiple rotation paths out of the zone.
Why was Hammerfall considered a weak drop despite having good loot?
Hammerfall's loot and rare density matched Ar'gorok, but its position on the right side of the map came with poor rotations. After clearing the location, players had limited options for their next zone — mostly solo open-world mobs that were slower and less efficient than the elite-heavy locations on the left side of the map.
What made the Southern River worth dropping at?
The Southern River corridor reliably spawned elite mobs and blue/purple rarity chests that accelerated ability leveling in the first two minutes. It went unmarked on the in-game map, which kept competition low throughout the event. Players who discovered it early consistently entered the mid-game ahead of opponents who had dropped at the more obvious popular locations.
Was Witherbark Village ever worth dropping at in Plunderstorm?
Rarely. The spread-out mob placement, CC totem abilities, and ranged attacks made Witherbark difficult to clear efficiently, and there was nowhere useful to rotate after clearing it. The only scenario where it made sense was if every other zone on the map was already taken and the player had no other option — not a situation that occurred often in practice.
How important was XP in the first minute of a Plunderstorm match?
Very important. Plunderstorm tied ability power directly to experience level, and falling behind on XP in the opening minutes meant arriving at mid-game with weaker abilities against players who had already gained another level or two. Drop location was the primary lever for the early XP race — which is why mob density and rotation efficiency mattered more than in most battle royale formats.
What did "rotation" mean in the context of Plunderstorm drop locations?
Rotation referred to the path a player took from their initial drop location to their next zone after clearing it — the Plunderstorm equivalent of the looting phase in a standard battle royale. Locations with good rotations had nearby high-value zones in multiple directions. Locations with poor rotations left players with only one viable next stop, or forced them through open terrain with sparse mobs, costing XP time before the first circle closed.
Last reviewed 2026-06-20 against Dragonflight Patch 10.2.6 Plunderstorm — Maintained by WowCarry's WoW team.